As email-based threats like phishing and domain spoofing become increasingly prevalent, implementing email authentication protocols such as DMARC (Domain-based Message Authentication, Reporting, and Conformance) is essential. If you’re using GoDaddy to manage your domain, here’s a step-by-step guide to help you set up a DMARC record effectively.
What is a DMARC Record?
A DMARC record is a DNS TXT entry that tells email receivers how to handle emails that fail SPF (Sender Policy Framework) and DKIM (DomainKeys Identified Mail) authentication checks. DMARC also enables reporting, so you can monitor and adjust your domain’s email security policies.
Step-by-Step Guide to Adding a DMARC Record in GoDaddy
Step 1: Log in to Your GoDaddy Account
- Visit GoDaddy’s website and log in with your credentials.
- Navigate to the My Products section.
Step 2: Access Your Domain’s DNS Management
- Under the “My Products” tab, locate the domain you want to update.
- Click on DNS next to the domain name.
Step 3: Add a New TXT Record
- Scroll down to the Records section and click Add. (If you already see a record with name ‘_dmarc’, edit this record instead of creating a new record. You can’t have multiple DMARC records.)
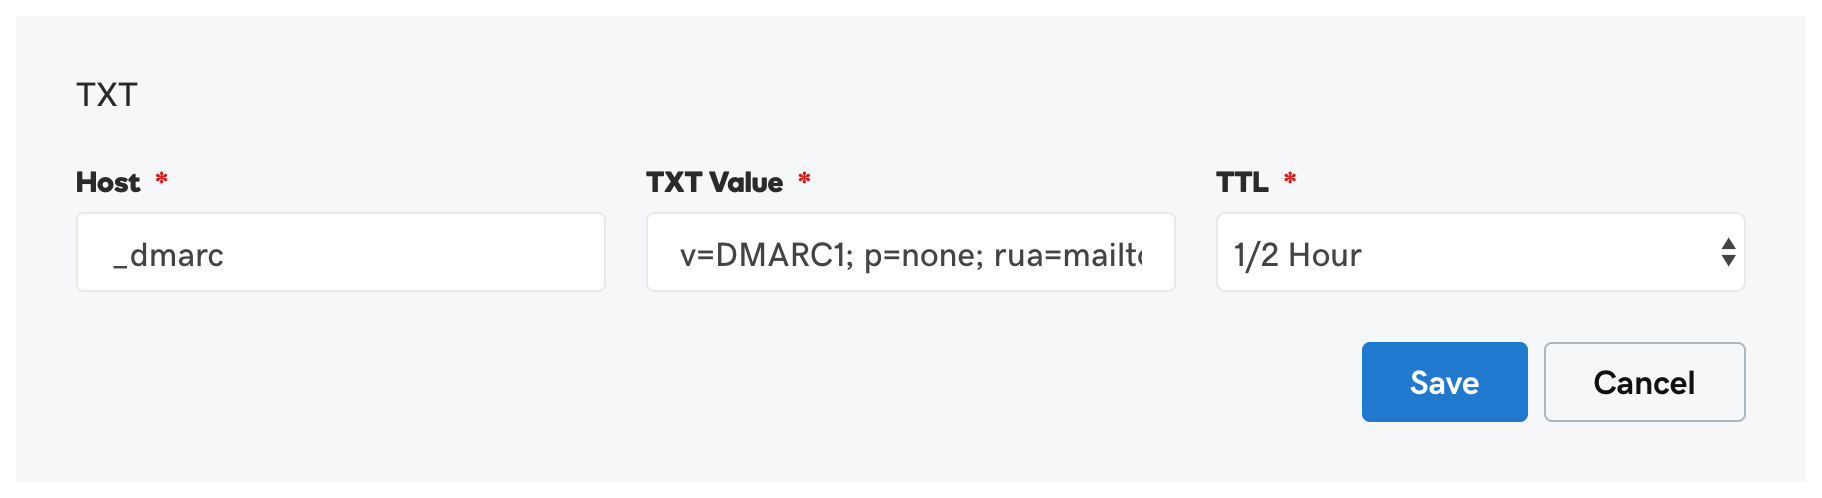
- In the pop-up window, set the following fields:
- Type: Select TXT from the dropdown menu.
- Host: Enter
_dmarc. - TXT Value: Input your DMARC TXT record. For example:
v=DMARC1; p=none; rua=mailto:rua.companyname@prodmarc.com; ruf=mailto:ruf.companyname@prodmarc.com; fo=1;v=DMARC1: Specifies the version.p=none: Indicates the policy (none, quarantine, or reject).rua: The email address for aggregate reports.ruf: The email address for forensic reports.fo=1: Instructs receiving mail servers to generate a DMARC failure report if either the SPF (Sender Policy Framework) or DKIM (DomainKeys Identified Mail) authentication check fails.
- TTL: Set to 1 hour (default is usually fine).
Step 4: Save the Record
- Click Save to add the DMARC record.
- Verify that the record appears in the DNS records list.
Note: It may take up to 48-hours to reflect your record, dependent on your DNS host.
Verifying Your DMARC Record
Once you’ve added the DMARC record, it’s essential to verify that it’s active and correctly configured. Use our DMARC checker tool to:
- Confirm the DMARC record is published.
- Validate the syntax and policy details.
Best Practices for DMARC Implementation
- Start with ‘none’ policy: When first implementing DMARC, set the policy to ‘none’ to monitor email flows without affecting delivery.
- Analyze Reports: Review aggregate (rua) and forensic (ruf) reports to identify legitimate email sources and unauthorized usage.
- Gradual Policy Enforcement: Move to ‘quarantine’ and eventually ‘reject’ policies after confirming all legitimate email sources are compliant.
- Maintain SPF and DKIM: Regularly audit your SPF and DKIM records to ensure they’re up-to-date.
- Leverage ProDMARC: Use advanced tools like ProDMARC to gain actionable insights from your DMARC reports, detect configuration issues, and streamline policy enforcement. ProDMARC’s threat intelligence features can also help identify and mitigate potential spoofing or phishing attempts.
Elevate Your Email Security with ProDMARC
ProDMARC simplifies DMARC implementation and empowers you with:
- Comprehensive analytics for monitoring email authentication.
- Threat intelligence to combat domain spoofing and phishing.
- Actionable reports for seamless policy management.
Take the guesswork out of securing your domain. Schedule a Demo with ProDMARC today and experience the difference!