Please follow the below two steps to configure DKIM for the Amazon SES
- Set up Easy DKIM for the “domain” in AWS SES console.
- Configure DKIM CNAME record in the public DNS of the domain.
Set up Easy DKIM for domain
- Login to your AWS account and navigate to “Amazon Simple Email Service”.
- In the navigation pane, under Identity Management, choose Domains.
- In the list of domains, choose the domain for which the Easy DKIM should be enabled.
- Under DKIM, choose Generate DKIM Settings.
- Copy the three CNAME records that appear in this section.
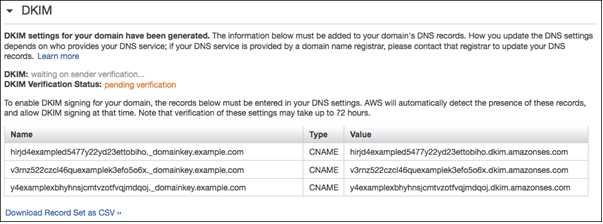
- Add the CNAME records to the DNS configuration for your domain.
| DNS provider | Procedure |
|---|---|
| Route 53 | If same account is used to managed email using Amazon SES and Route 53, then Use Route 53 to automatically update the DNS settings for your domain. Otherwise, we need to complete the procedures shown in Editing Records in the Amazon Route 53 Developer Guide. |
| Other DNS providers | Need to check with DNS provider documentation |
- Amazon SES usually detects changes to your DNS configuration within 72 hours.
- Amazon SES is available in several AWS Regions. If we use more than one AWS Region to send email, you have to complete the Easy DKIM setup process in each of those regions to ensure that all of your email is DKIM-signed.