Please follow the below two steps to configure SPF and DKIM for the Sendgrid (recommended by Sendgrid)
- Configure SPF and DKIM signing for the mails in Sendgrid portal
- Configure the required DNS CNAME records
Configure SPF and DKIM signing for your custom domain in Sendgrid
Please follow the below steps to configure SPF and DKIM for your custom domain in Sendgrid portal.
- Sign in to sendgrid portal with and navigate to settings > Sender Authentication.
- In the domain authentication section, click Get Started / Authenticate Your Domain.
- Ignore the “Which Domain Name Server (DNS) host do you use?” and “Would you also like to brand the links for this domain?” part and click Next.
- Fill in the domain that you want to send the mails from. Also ensure in Advanced Settings “Use automated security” is enabled. Click Next
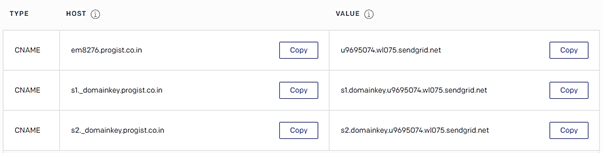
- Copy the CNAME records (3 records) which are displayed in the portal and add the same in the DNS.
- Once the records are added in the portal, click on verify to verify the records.
Publish three CNAME records for your custom domain in DNS
The CNAME are unique to every account and would look like below sample.