The first step you need to take to get ready for Brand Indicators for Message Identification (BIMI): Get your logo into SVG format.
Preparing your logo: creating the SVG
Your logo for BIMI must be in Scalable Vector Graphic (SVG) format. But the SVG must adhere to the SVG Portable/Secure (SVG-P/S) profile, and there is no export template for vector applications like Adobe Illustrator today. That means you’ll have to create it using the Adobe Illustrator.
Option 1: Using Adobe Illustrator
Step 1:
Transform pixels to vector format (‘.ai’, ‘.eps’, ‘.pdf’, ‘.svg’)
Many companies have logos created in Photoshop or other design software that is made up of pixels. This won’t work. Instead, you need to first convert your logo to vector format.
Many brand logos are easily convertible wordmarks using fonts and line art. But for some organizations with complex art, you may need to spend some time re-working the design to be vector compatible.
Step 2:
Export as SVG Tiny 1.2
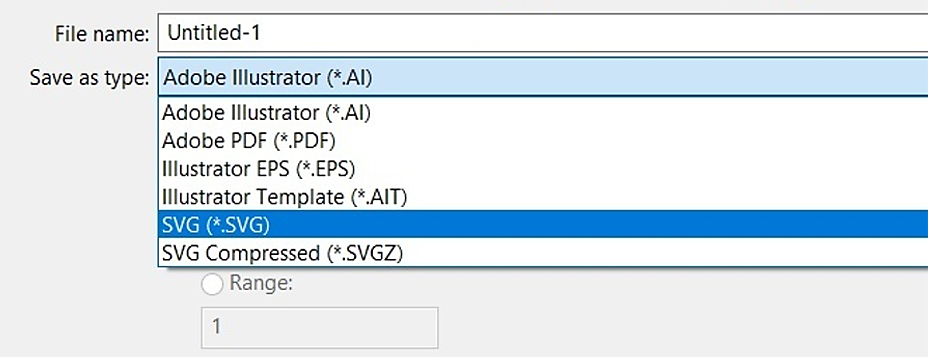
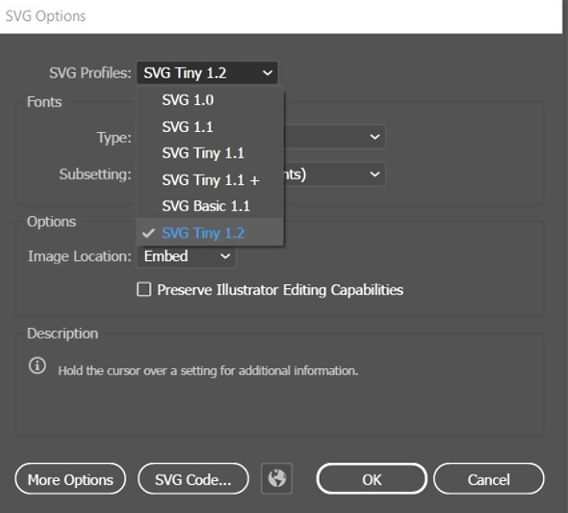
Once you have the logo in a vector format, you’ll need to start by exporting it as an SVG Tiny 1.2 profile. In Adobe Illustrator® you can do that via the “Save As” dialog:
- Double-check that your image is vector-based (‘.ai’, ‘.eps’, ‘.pdf’, ‘.svg’).
- Open your file in Adobe Illustrator.
- Save your file by using the option “Save As.”
- Once the dialog box is open, name the file and choose “SVG (SVG)” from the dropdown “Format.”
- Click on “Save” and wait for a new dialog box to open.
- In the “SVG Profiles” dropdown, select “Tiny 1.2” and then click “OK.”


Step 3:
Open your trusty text editor
Next, you’ll need to open your SVG file in a text editor (e.g., Notepad or Notepad++), or a code editor like Vim or Nano. As SVG files are text files, the most important point is that you can open, edit and re-save to a “txt” format with a “.svg” file extension.
After you open the file, there are a few edits you will need to make:
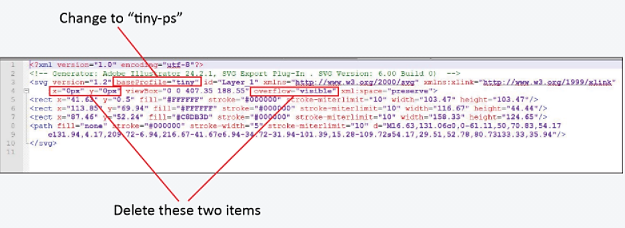
- While on the SVG file source, verify you see the following settings in the header:
xmlns=http://www.w3.org/2000/svg, version=”1.2, baseProfile=”tiny-ps“
There may be other information in the top of your file like the sample below, but these MUST be present
For example, you may see a string like this:
<svg version=”1.2″ baseProfile=”tiny-ps” id=”Layer_1″ xmlns=”http://www.w3.org/2000/svg” xmlns:xlink=”http://www.w3.org/1999/xlink” viewBox=”0 0 1080 1080“ xml:space=”preserve”>
If you exported from Illustrator, you’ll need to change the baseProfile to tiny-ps, and delete the x=, y= and overflow items.

- Next, you’ll want to add the title element. We suggest hitting return after the xml:space=”preserve” item and put the title element there. Put your company name in this field.
- Careful you don’t put the title item inside the graphic code itself. Like in this example screen shot below, right after the “=preserve” stuff on a new line is fine. But, if you go after the line that starts with <rect> then validation may fail.

- Resave your file as text format, with SVG extension.
Option 2: Use the BIMI working group’s graphic conversion tools
The BIMI working group has released graphic conversion tools to help format your logo as an SVG-P/S.
- Their tools include: Adobe Illustrator Export Script: A script that can be added to Adobe Illustrator (either Windows or MacOS) and offers the ability to convert an open SVG Tiny 1.2 file into SVG P/S format.
